Estimated reading time: 7 minutes
We’ve recently started rolling out a new version of our “Auto Messages” tab inside of the Apptoto application. All new users have access to it, and all existing users can now try it. This blog post will cover some of the changes to how the Auto Messages editor works and how you can use it to simplify scheduling automated messages.
But first, a quick overview of automatic messages
At its core, Apptoto is an automatic messaging platform for your calendar. Apptoto aims to provide businesses with an easy-to-use, easy-to-customize, and easy-to-orchestrate mechanism for communicating with clients in their appointment book.
The main reason that users want such a system is to send automatic messages before every appointment to A) remind the client and B) establish a way for the client to reply back and confirm, cancel, or reschedule more easily.
But there are other reasons you might want to send messages before or after appointments on your calendar. You might want to follow up with clients to remind them to do something or to book their next appointment. Or you might want to send a message in the evening after the client books an appointment to confirm the booking.
Moreover, you might want to only send those messages for certain appointments. For example, you might want only to send a follow-up message if the client is qualified. Or you might want to not send messages to appointments that have the word “Private” in them.
At Apptoto, we’ve found that each of our users/businesses has a different take on how they want to set up their workflow. We’ve seen businesses want:
- The same message sent to everyone
- Full, explicit control over every message sent
- Messages sent only on weekends.
- Messages sent at 3 p.m. because that is when their staff has time to respond in case clients respond
- Clients to be unable to respond to messages
- Clients to be able to confirm but not to cancel.
Existing Apptoto Messaging Features
Over the years, we’ve developed a platform that can accommodate everything discussed above; however, it’s been very difficult to set up without talking to an Apptoto Expert™ (which we offer free of charge with all our product plans).
As a matter of fact, when we survey our users, they don’t even realize that we offer the following features:
- Rule-based Messaging – Segmenting appointments (e.g., “Consultations” vs. “Service” appointments or “in-person” vs. “over the phone” appointments) and customizing the messages for each segment.
- Initial Messages – Sending messages when the appointment is first created.
- Follow-up Messages – Sending messages after an appointment has been completed.
- Auto Replies (Bots) – Automatically replying or sending another message.
- Customizable Timing – Controlling when messages are sent.
- Additional Messages – The ability to send more than one message to each appointment.
- Customized Prompt Options – The ability to configure what options are available when clients respond to reminders or initial booking messages.
Enter the new Auto Messages Editor
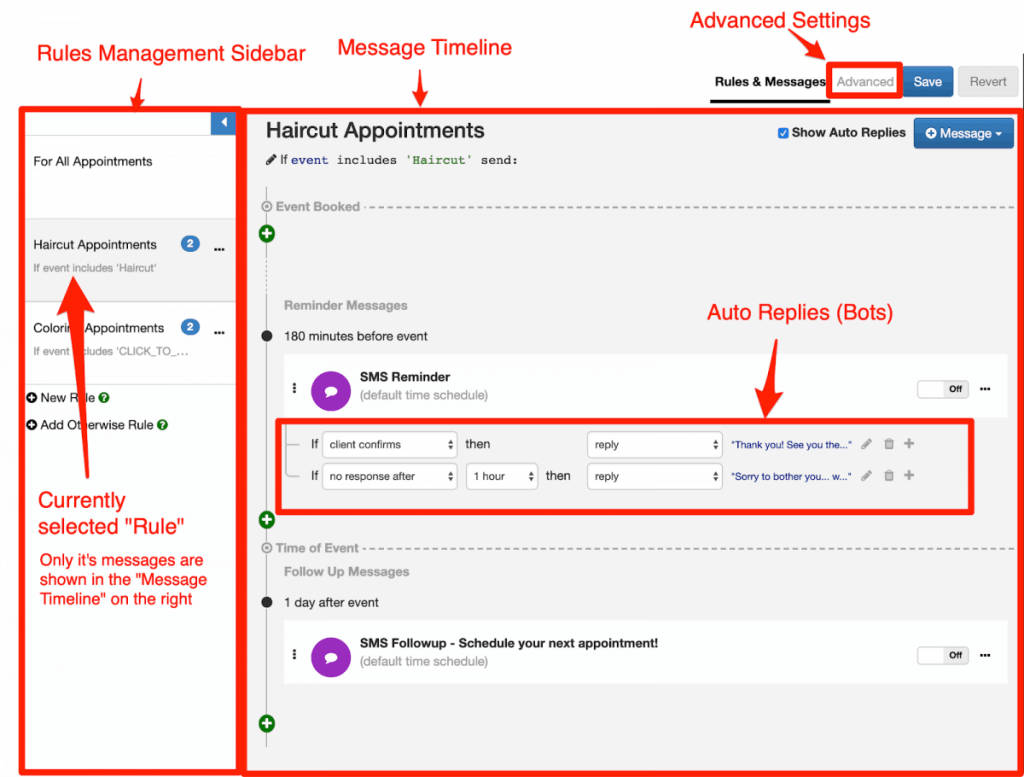
In a nutshell, the new Auto Message Editor (shown below) was designed to bring those features listed above to the forefront and make them easier to use.
The main areas of the new Auto Message Editor include
- Rules Management Sidebar (on the left)
- Message Timeline (on the right)
- Auto Replies (below each message)
- Advanced Settings (Separate tab at top)
Rules Management Sidebar
“Rules” are the same thing as “Conditions” in the old Auto Messages Editor.
You can edit Rules, add Sub-Rules, Move, Copy, and Remove Rules from the “Context Menu” here:
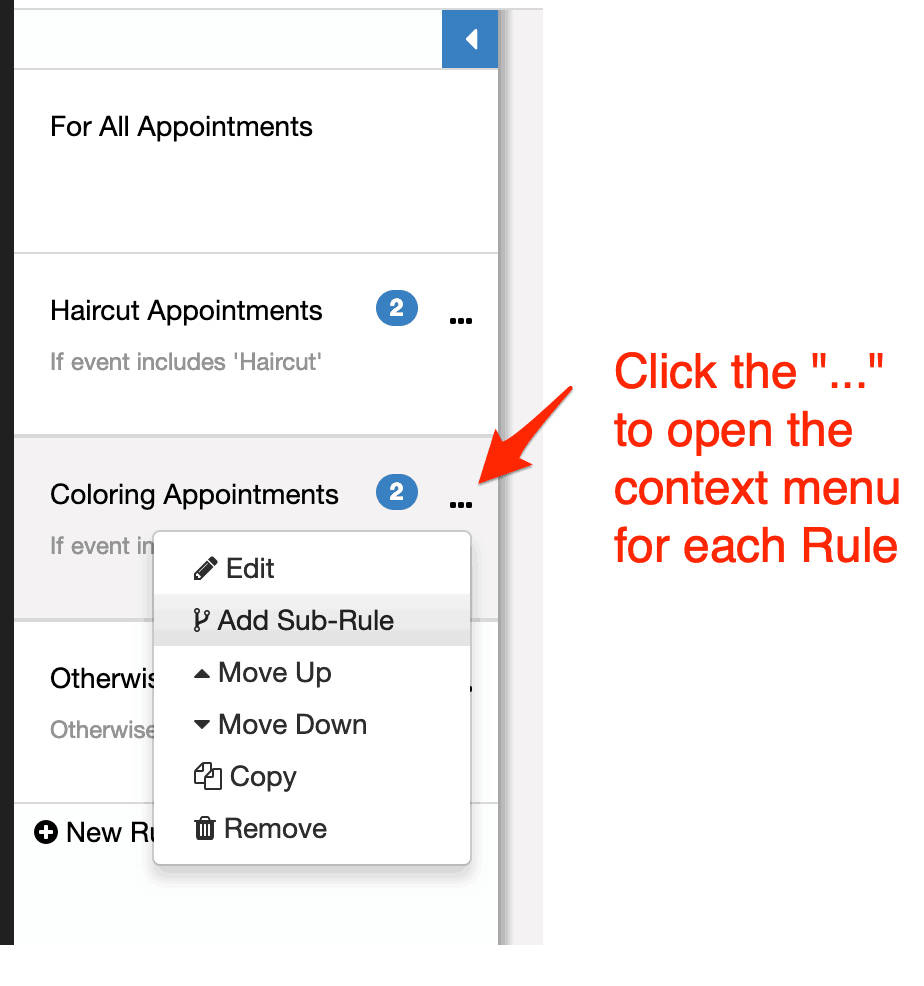
The new Auto Messages Editor lets you focus on one rule at a time. The selected rule is highlighted (with a gray background on the left). You can choose other rules to work on by clicking on them in the sidebar.
A new feature with this update is the ability to assign each “Rule” a label.
The label is useful while editing the messages on the Auto Messages tab and when referencing the messages elsewhere in the application. For example, you can see which Rule was applied to an appointment when you open the Appointment Editor here:
Messages can now be easily dragged and dropped from one “Rule” to another.
The “Otherwise” Rule is now easily added and serves as a “catch-all” for appointments. For example, if you want to send a specific message if it’s a haircut, a different message if it’s a coloring appointment, and if it’s neither of those, then send a “catch-all” message; you can easily click “Add Otherwise Rule” and then add that catch-all message to it. Like so:
Message Timeline
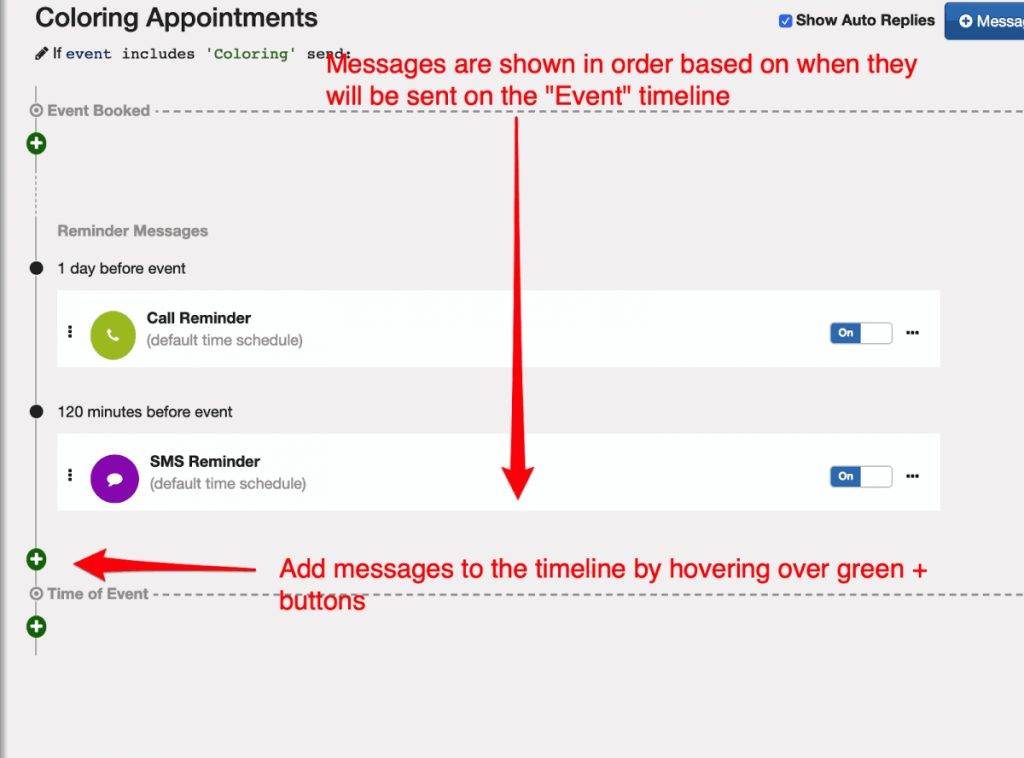
The Message Timeline on the right serves as a visual representation, showing when messages will be sent. The old Auto Messages Editor did not order the messages for you, so sometimes messages that were sent last would appear first in the list, leading to a lot of confusion.
Auto Replies (Bots)
The “Auto Replies” feature in the Auto Messages section of Apptoto lets you set up actions to take place when the client replies (or forgets to reply). We’ve had this feature for quite a while, it was just not shown by default.
Now you can easily add an Auto Reply / Action from the message sub-menu on the right.
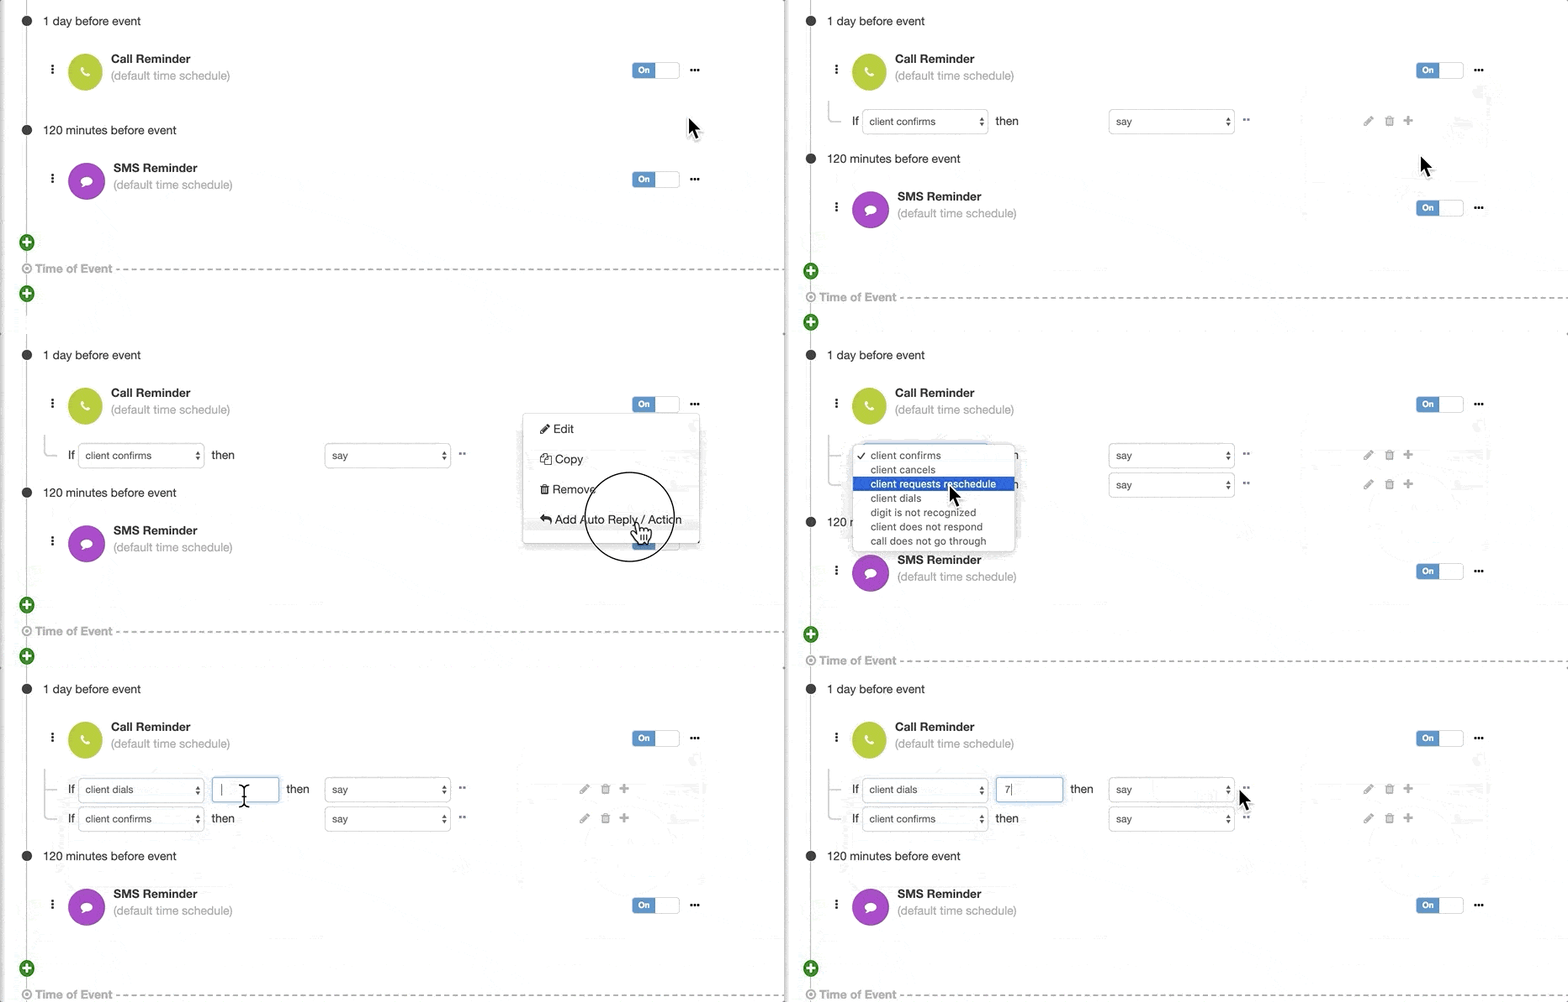
For example, you can set up an auto-reply to say “Thank you” if the client dials 7 during a call.
If the client doesn’t respond to an SMS (Text) within one hour, then send a new message.
Advanced Settings
The Advanced Settings section of Apptoto’s Auto Messages is not new by any means but is now easily accessible by clicking “Advanced” at the top of the Auto Messages editor (Before, it was hidden down below).
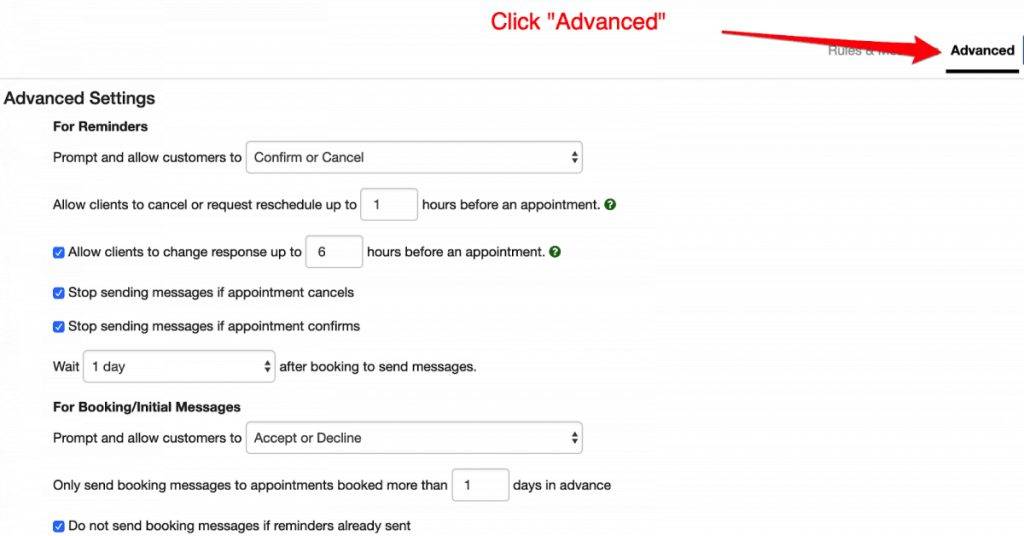
The settings you’ll find under Advanced allow you to control what the default “prompt” is for reminder messages and what happens when clients reply.
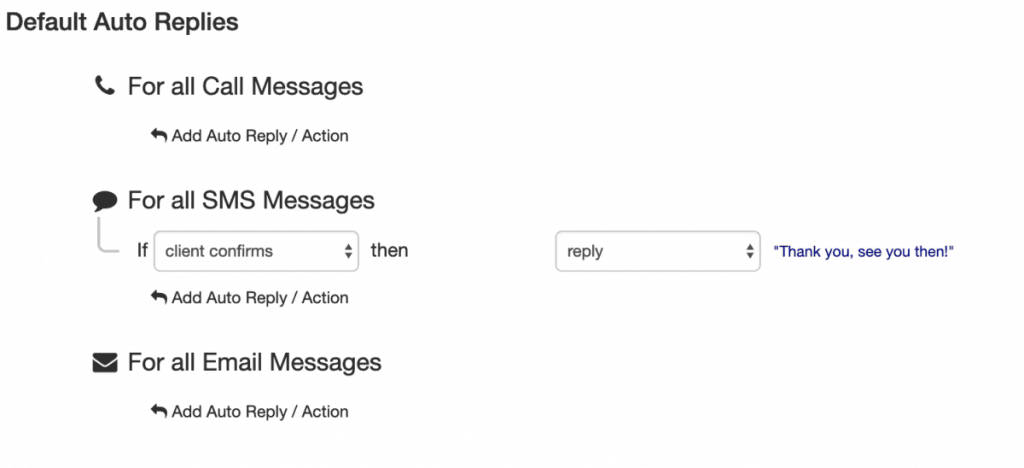
You can also set up default “Auto Replies” under Advanced for different types of messages. This allows you to avoid setting up “Auto Replies” for each individual message if you know you want the same thing to happen for all of them.
Please let us know if you have any feedback about scheduling automated appointment messages with the new Auto Message interface. We are always open to suggestions and feedback. Simply email support@apptoto.com. We’re always happy to hear from you. Thanks!
